We handgun shooters get all wrapped around the axle about different shooting stance techniques. Listening to the arguments about which one is best, you’d think that only one certain technique will save you from certain death. We even name shooting stances after people and geometric patterns like they were figuring skating moves or something.
There’s the Isosceles stance, currently in vogue around the competitive and tactical circuits. That one is named after a triangle. We’ll explain why in a minute. Then there’s the Weaver stance. No, it has nothing to do with custom fabric—it’s named after the guy who invented it. Then there’s the Weaver’s second cousin twice removed stance. Just kidding, I don’t think we have that one—yet. Then there’s the relatively new Center Axis Relock (CAR) stance. It’s a big deal in certain SWAT circles where confined spaces and weapon retention are important. Last but not least is my personal favorite, the Point the Fiery End of the Damn Gun Downrange and Shoot stance, which we’ll also get into.
Let’s take a look at how to execute each of these four techniques. Along the way, we’ll talk about a few pros and cons so you can decide which one you like. If you hate them all just invent your own. Then you can name it after whoever or whatever you want.
The Isosceles stance became all the rage in the 1980s as pistol competitions started to increase in popularity. Rather than using opposing muscle tension like the Weaver Stance, which we’ll discuss next, the Isosceles gets its benefit from your bones and skeletal structure.
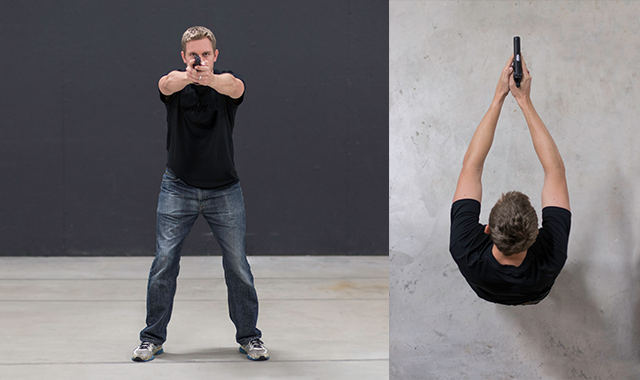
Start by placing your feet roughly shoulder width apart or maybe a little wider. Technically, this stance has your feet side by side. However, I like to place the non-shooting side foot a little forward of the other to give more front-to-back support and mobility. Don’t take this angle too far as the whole point of the Isosceles Stance is to present your body square on to the target.
One of the reasons that it’s popular, besides being a very natural body position, is that it presents the front plate of body armor, if you should be wearing it, directly towards the incoming fire.
The arm position is easy. Using a two-handed grip with the support hand fingers wrapped around the firing hand fingers on the front of the pistol grip, extend both arms forward equally. A low-flying helicopter viewing your stance from above will note that you’ve just formed an Isosceles triangle shape with your chest and arms, hence the name of the technique.
The traditional Isosceles Stance has the elbows locked to allow your arm and shoulder bones to deal with recoil. Many shooters use a slightly bent elbows approach for flexibility. We’re not going to engage in pointless arguments about whether locked elbows or slightly flexed elbows are correct—the main point of this stance is that both arms are used equally to push forward on the handgun.
The big benefit of the Isosceles, aside from the body armor thing, is that it’s very natural and facilitates rapid movement to either side. It also works well if you’re cross-eye dominant. That means that your left eye is the dominant one even though you’re right-handed, or vice versa. The drawback of the pure Isosceles stance is that you have little stability front-to-back.
The Weaver technique was developed back in the late 1950s, when life was perfect, by a serious handgun competitor and lawman Deputy Sheriff Jack Weaver. In those days, plenty of speed shooters still shot from the hip, and his technique was a way to get the pistol sights into view quickly and provide stability from shot to shot. Colonel Jeff Cooper, the founder of Gunsite Academy, helped make this technique famous and it’s still a core part of the Gunsite curriculum.
Here’s how you do it. Channel Muhammad Ali and assume a boxing stance with the non-shooting side foot forward and angled out to that side a bit.
Now lean forward on the front foot. The support side leg will be a bit bent at the knee, and the shooting side leg will be almost straight. Think in terms of leaning into the shot.
he grip is classic two-handed with your shooting hand positioned high on the pistol and the support hand fingers wrapping around the front of the shooting hand fingers. The firing arm is extended but with the elbow bent—not locked.
The support arm is bent significantly with the elbow pointed towards the ground. This works because the foot position has your support shoulder more forward than the shooting side shoulder, so the support arm has to be “shorter.”
Here’s the tricky part. With the shooting arm, push forward. With the support arm, pull the gun back towards your body. This opposing pressure stabilizes the pistol and helps you control recoil.
The big benefit of the Weaver technique is control. Using the opposing tension of shooting and support arms you can really develop a stable platform that helps you aim and control recoil. The downside is that it’s not a natural technique. It’s something that has to be “trained-in” because your brain will, by default, want to push against an object (the pistol) headed your way with both arms. Another disadvantage is that if you’re right-handed, but your left eye is dominant, it’s awkward to get a good sight picture.
The Modified Weaver, sometimes called the Chapman, relaxes things a bit. Bring the support foot closer in and extend the firing arm. That makes it easier for cross-eye dominant shooters.
By the name you’d think this one was invented by an aeronautical engineer. Nope, it was created by Paul Castle, a law enforcement officer and trainer. Always looking for a better way for tactical types to perform quickly under stress, Castle also factored weapon retention into this technique.
Like the Weaver, you assume an aggressive martial arts-type stance with the support side foot well forward. Think of it as a fighting position from which you can easily press forward or withdraw as needed.
As for the arms and grip positions, that’s where things get interesting. Traditional stances like Isosceles and Weaver have the gun pushed way out forward towards the target. That’s pretty much how we all do it, but Castle makes use of the optimal focal distance of the eyes. For most people that might be in the 12 to 16-inch distance from their eyeball. Using a traditional shooting stance, the extended arms put the gun sights a couple of feet in front of the eyes.
With the CAR technique, your firing hand is actually about half or maybe two-thirds of the way extended, so the sights are relatively close and in the ideal focal range of 12-16 inches. The pistol is canted towards your support side so that the sights are actually more in front of your support side eye. The canted position also prevents having to cock your wrist in an unnatural position and aligns the wrist with the forearm better to absorb recoil.
The support hand also plays a very different role. If you tried to use it in the traditional way with fingers around the front of the grip, you’d find your support wrist severely crimped and not offering much support. Instead, place the palm of your support hand in front of the grip and your firing hand fingers. The picture here tells the story.
There are a number of benefits that the CAR technique seeks to achieve. The gun is in close, so maneuverability is excellent, even indoors. Since it’s close to your body, you’re in a great position to fend off an attacker trying to gain control of your gun. Also since it’s in close, it’s easier to focus on both the gun sights and the target.
With traditional techniques where the gun is well forward, you have to concentrate on front sight focus when your brain wants to focus on the target. This method puts the sights right in front of one eye, so you’re less distracted by your brain trying to focus on both the sights and the target. It’s also a great technique for shooting from the inside of a vehicle, since the overall position is so compact.